Title here
Summary here
PID Controllers
Imagine telling your robot: “drive forward until you have moved 24 inches, then stop.” Simple, right?
In practice, it is much harder than it sounds. Due to momentum, battery drain, and friction, a robot running at full power will zoom past the target, slam on the brakes, roll back a bit, then wobble back and forth before finally settling. This wastes time and makes autonomous routines unreliable.
A PID controller solves this problem. It is a smart feedback system that constantly checks where the robot is, calculates how far off it is from the target, and adjusts the motor power automatically to guide the robot smoothly to the exact right spot.
Why does this matter?
PID controllers are used in everything — cars, drones, thermostats, autopilot systems, and of course robots! In VEX, PID helps robots drive in perfectly straight lines, hold an arm at an exact angle, spin a flywheel at a consistent speed, and turn to an exact heading.
Key Terms
How it Works
A PID controller runs in a loop — constantly reading a sensor, calculating the error, and adjusting motor power. The goal is always to drive the error down to exactly zero.
$$ \text{Error} = \text{Target Position (Setpoint)} - \text{Current Position} $$The controller calculates motor power using three separate parts — called the P, I, and D terms — and adds them all together.
The Three Terms Explained
Proportional (P) — Reacts to current error
The P term gives the motors power based directly on how far away the robot is from the target. If the error is large, apply lots of power. If the error is small, apply less power.
$$ \text{P} = K_p \times \text{Error} $$The problem with P alone: as the robot gets close to the target, the power drops to nearly zero — but not quite zero. The robot stalls just short of the goal! If you increase the power to fix this, the robot overshoots the target and bounces back and forth endlessly.
Integral (I) — Reacts to accumulated error over time
The I term fixes the stalling problem. It adds up (accumulates) all the small errors over time. If the robot is stuck just barely short of the target, the accumulated error grows bigger and bigger until it creates enough extra power to push the robot the rest of the way.
$$ I = K_i \times \text{Total Accumulated Error} $$Warning: if the I gain is set too high, the robot builds up too much power on the way to the target and overshoots badly.
Derivative (D) — Reacts to how fast the error is changing
The D term acts like a shock absorber. It looks at how quickly the error is changing. If the robot is rushing toward the target very fast (error decreasing rapidly), the D term applies a braking force to slow it down before it overshoots.
$$ D = K_d \times (\text{Current Error} - \text{Previous Error}) $$A well-tuned D term can eliminate overshoot completely, letting the robot snap precisely to its target.
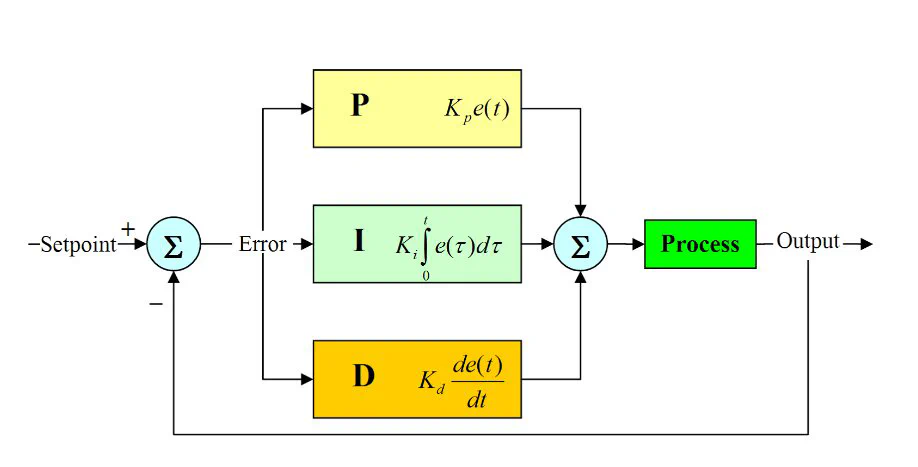
All Three Together
When you combine P + I + D, you get smooth, accurate movement. Each term has a gain constant (Kp, Ki, Kd) that controls how much influence that term has. Adjusting these constants is called tuning.
PID in VEX Robotics
VEX competition teams use PID loops to create reliable autonomous routines. You can combine PID with motor encoders, IMU sensors, Odometry, and AprilTags for highly accurate navigation.
Troubleshooting
Remember: PID software cannot fix a broken robot. If a wheel is loose, a gear is slipping, or a sensor is giving bad data, PID will struggle. Always fix mechanical problems before tuning software.
Tuning Tips
Example PID Code
void driveToTargetPID(double targetDegrees) {
    // 1. Tuning Constants (Change these based on your robot's weight!)
    double Kp = 0.0;
    double Ki = 0.0;
    double Kd = 0.0;

    double error = 0;
    double prevError = 0;
    double totalError = 0;
    double derivative = 0;

    // Clear sensor history before starting the autonomous routine

    // 2. The Feedback Loop
    while (true) {
        double currentPosition = LeftDriveEncoder.position(degrees);

        // Calculate present error
        error = targetDegrees - currentPosition;

        // Exit loop cleanly once settling time is complete and error is minimal
        if (std::abs(error) < 3.0) {
            break;
        }

        // Calculate Integral (only accumulate error close to target to avoid windup)
        if (std::abs(error) < 150.0) {
            totalError += error;
        } else {
            totalError = 0;
        }

        // Calculate Derivative (rate of change)
        derivative = error - prevError;

        // Calculate master output power
        double motorPower = (error * Kp) + (totalError * Ki) + (derivative * Kd);

        // Restrict power limits to safe operating standards (-100% to 100%)
        if(motorPower > 100.0) motorPower = 100.0;
        if(motorPower < -100.0) motorPower = -100.0;

        // Command the hardware
        LeftMotor.spin(forward, motorPower, percent);
        RightMotor.spin(forward, motorPower, percent);

        // Save history for the next frame iteration
        prevError = error;

        // Fixed loop delay (essential for math stability over time)
        wait(20, msec);
    }

    // 3. Hard brake to secure final target position
    LeftMotor.stop(brake);
    RightMotor.stop(brake);
}
Quiz yourself