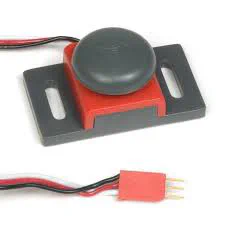
Sometimes the most reliable sensor is the simplest one. When you need to know for certain that your robot has physically touched something — a wall, a game piece, or the edge of a mechanism — a bumper switch is often the best tool for the job.
A bumper switch is a small button-like sensor. When something presses it, it tells the robot “something touched me.” When nothing is pressing it, it says “nothing here.” That is all it does — but that simple yes/no answer is incredibly useful!
Why does this matter?
Bumper switches are one of the easiest sensors to learn with. They teach you the basics of if/else logic in code, and they are extremely reliable because they do not depend on light, color, or distance calculations — just physical contact.
Key Vocabulary
Digital Input: A signal that is either ON or OFF — nothing in between. A bumper switch sends a digital input: either pressed (1/true) or not pressed (0/false).
Debouncing: When a switch is pressed, it can create very rapid tiny ON/OFF signals before settling — like a bouncing ball. Debouncing means filtering out those extra signals so your code only reads one clean press.
Limit Switch: A bumper switch placed at the end of a mechanism’s range of motion (like the top of a lifting arm). It stops the motor before the mechanism drives itself past a safe limit.
Homing: A startup routine where a mechanism moves slowly backward until it hits a bumper switch. This tells the robot exactly where “position zero” is, which is needed for accurate motor encoder tracking.
How it Works
Inside a bumper switch is a simple mechanical contact. When you press the button, it closes (or opens) an electrical circuit. The robot’s brain reads this contact as one of two states: pressed or not pressed.
Because it is so simple, bumper switches are easy to program with basic if/else statements:
If pressed → stop the motor
If not pressed → keep moving
One important thing to remember: bumper switches only detect whether something touched them — not how hard. If you need to measure force or distance, you would need a different sensor.
Also, mounting location matters a lot. The switch must be placed exactly where the robot will naturally make contact. If the switch is even slightly misaligned, the robot might miss it completely.
Timing Matters
Your robot’s code runs in a loop — it checks sensors, calculates, then checks again. If the loop runs too slowly, the robot might zip right past a bumper switch before the code ever checks it!
For example, if your robot moves at 5 feet per second and your code only checks the switch every 100 milliseconds (0.1 seconds), the robot could move 6 inches between checks — easily missing the contact point.
Running your code loop every 20 milliseconds (20ms) is a good standard that keeps the robot reactive and responsive.
VEX Robotics
VEX V5: Bumper switches plug into standard Smart Ports. The V5 Brain automatically detects the sensor and shows its live state on the dashboard screen.
VEX IQ Gen 2: Uses the same Smart Port system across 12 universal ports, making it easy to swap sensors.
Cable care: Bumper switches are often placed at impact zones, so protect the wires! Route cables away from sharp metal edges and leave enough slack so the wire does not get pulled tight when the robot flexes during collisions.
Pros and Cons
Pros
Very simple to understand and program.
Extremely reliable for detecting physical contact.
Easy to troubleshoot — it is either pressed or it is not.
Cons
Only gives a yes/no answer — cannot measure distance or force.
Must be precisely positioned or the robot will miss the contact point.
Cables can break or come loose at impact zones if not protected.
Build and Coding Tips
Mount the switch securely so it cannot wiggle or shift position.
Make sure cables have enough slack for the full range of motion of any nearby moving parts.
Always label your cables so you know which port connects to which sensor.
Quiz yourself
What is the first thing you should measure or inspect when the robot has a problem with bumper switches?Start with the part of the robot most directly connected to digital input. Then check one measurable behavior, such as distance, time, angle, sensor value, current draw, or number of successful cycles.Why is changing one variable at a time important when testing bumper switches?If you change several things at once, you may fix the symptom without knowing which change mattered. One-variable testing makes the result easier to trust and repeat.