Before engineers build a final product, they always test their ideas first. Instead of permanently gluing or soldering every wire, they use a breadboard to build a quick, temporary circuit they can change easily.
A breadboard is a reusable plastic board that lets you connect electronics — like an Arduino, LEDs, resistors, and sensors — without any soldering. Think of it like a Lego base where you can snap pieces in and pull them back out whenever you want. When your circuit works, you can make it permanent later. If it doesn’t work, no problem — just rearrange it!
Why does this matter?
Breadboards save time and money. Making a mistake on a breadboard costs you nothing. Making a mistake on a permanent circuit can break expensive parts. Professional engineers use breadboards too, not just beginners!
How it Works
Under the plastic surface of a breadboard are hidden metal spring clips. When you push a wire or component leg into a hole, these clips grip it and create an electrical connection — no glue or solder needed!
Here are the two main sections of a breadboard:
The Terminal Strip (the middle section)
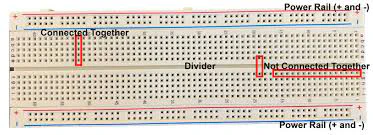
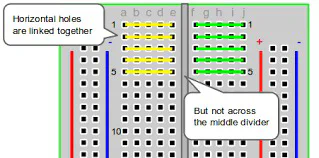
The center is divided into two halves, usually labeled columns A–E on the left and F–J on the right, with a gap down the middle.
In each half, the 5 holes in any single row are all connected to each other underground. So if you plug a wire into Row 1, Hole A — it automatically connects to Row 1, Holes B, C, D, and E too.
The gap in the middle is called the IC trench. It is designed to hold computer chips (called ICs or integrated circuits). The gap keeps the chip’s left pins separated from its right pins, preventing accidental short circuits.
The Power Rails (the sides)
Along the far left and far right edges are long vertical strips marked with a red (+) line and a blue (-) line.
Unlike the short rows in the middle, these strips are connected all the way up and down.
You plug your Arduino’s power (5V) and ground (GND) into these rails once, and then every component on the board can easily tap into power from anywhere along the rail.
Important Rules
An Arduino pin can only handle a small amount of electricity — a maximum of 40mA (milliamps). Breaking this rule can permanently damage your Arduino!
Always use a resistor with LEDs: If you connect an LED directly to an Arduino pin without a resistor, too much electricity flows through and burns out the LED or the Arduino pin instantly. A resistor limits the current to a safe level. (See the
Resistors guide for more!)
Don’t connect motors directly to Arduino pins: Motors, servos, and other high-power devices need much more electricity than an Arduino pin can give. Instead, use a separate power source (like a battery pack) and a special controller to run those devices. The Arduino just sends the control signal.
Pros
Easy to change: You can pull components in and out hundreds of times. No permanent damage, no waste.
Easy to troubleshoot: Because everything is spread out and visible, it is simple to trace wires, spot mistakes, and test individual parts.
Cons
Not very sturdy: Wires are only held in by spring tension. If your robot shakes or vibrates a lot, wires can wiggle loose and cause random, confusing problems.
Tricky failures: A loose wire can cause your circuit to work sometimes but not others. This can look like a software bug, but it is actually just a physical connection problem — so always check your wiring first!